How can I create and configure a scheduled scan with WithSecure Cloud Protection?
The Scheduled Scanning feature in WithSecure Cloud Protection allows you to (re)scan Salesforce files and attachments for harmful and disallowed content at regular intervals (daily, weekly, monthly) and predefined times.
When you create a scheduled scan job, the current manual scan settings will be used as the basis for the scheduled scan. Nevertheless, the scheduled scan settings are independent from the manual scan settings, and can be changed if need be.
To create a scheduled scan job:
- Go to WithSecure Cloud Protection > Administration > Manual Scan.
- Configure the scan:
- Select the targets.
- Choose to scan content based on either the creation time or the modification time: set the current day as the end date. For the start date, set a date which would produce the desired date range within which the files were created or modified.
- An example: The current date is September 1. To scan the files that were created during August, set the end date to September 1 and the start date to July 31 (the date one month before today), so that it’s the N+1 days of the desired period to scan.
- Note: You can set arbitrary dates and change the date range later in the AFSC__FS_ManualScanSetting__c custom object explained later in this article.
- Define scan and notification settings.
- Select the maximum number of files to scan.
- Click first the Scheduled Scanning section to open it, and then click the Create button.
- You will be redirected to the Schedule Apex page:
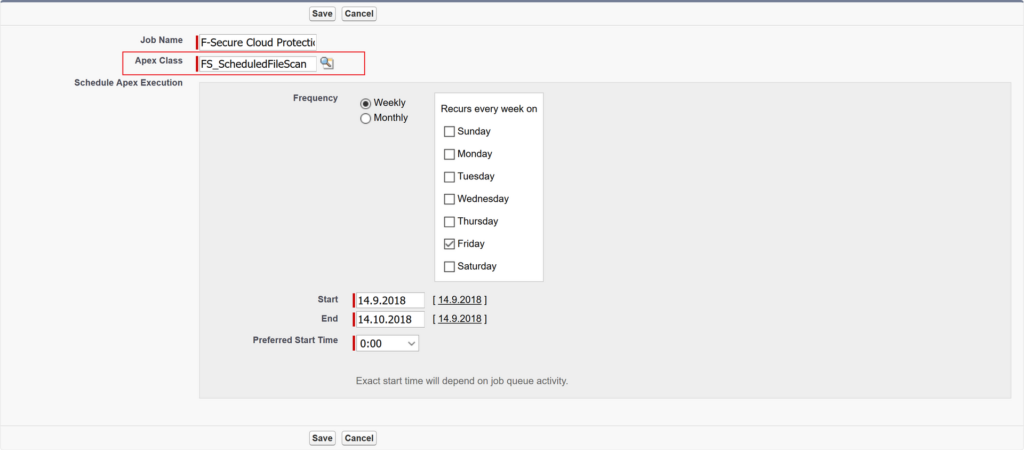
- Configure the scheduled scan job by defining the following values:
- Job Name
- Apex Class (Set this to FS_ScheduledFileScan.)
- Frequency
- Start and End Date
- Preferred Start Time
- Click Save.
The scheduled scan job is created and will be executed according to your specifications.
Note: If you later want to modify the frequency, start and end dates, or the preferred start time of the scheduled scan job, you first have to delete the existing scheduled job and then create a new one.
How can I change the scheduled scan settings in the custom object?
How can I change the scheduled scan settings in the custom object?
Once the scheduled job is created, you can modify its settings in the AFSC__FS_ManualScanSetting__c custom object, which stores settings for the manual and scheduled scan jobs.
To modify the scheduled scan settings:
- Open Setup > Developer Console.
- Select File > Open. The Open window is displayed:
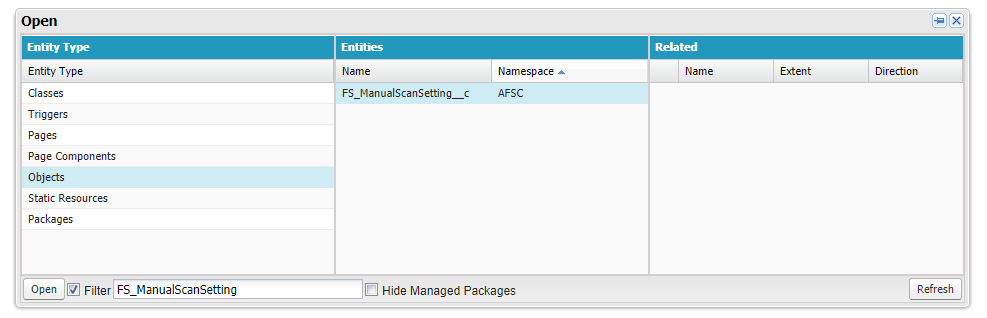
- In the Open window, select Objects from the left column and, in the Filter field, type in FS_ManualScanSetting. The desired object is shown in the middle column.
- To open the custom object, click the Open button.
- The following panel is displayed:
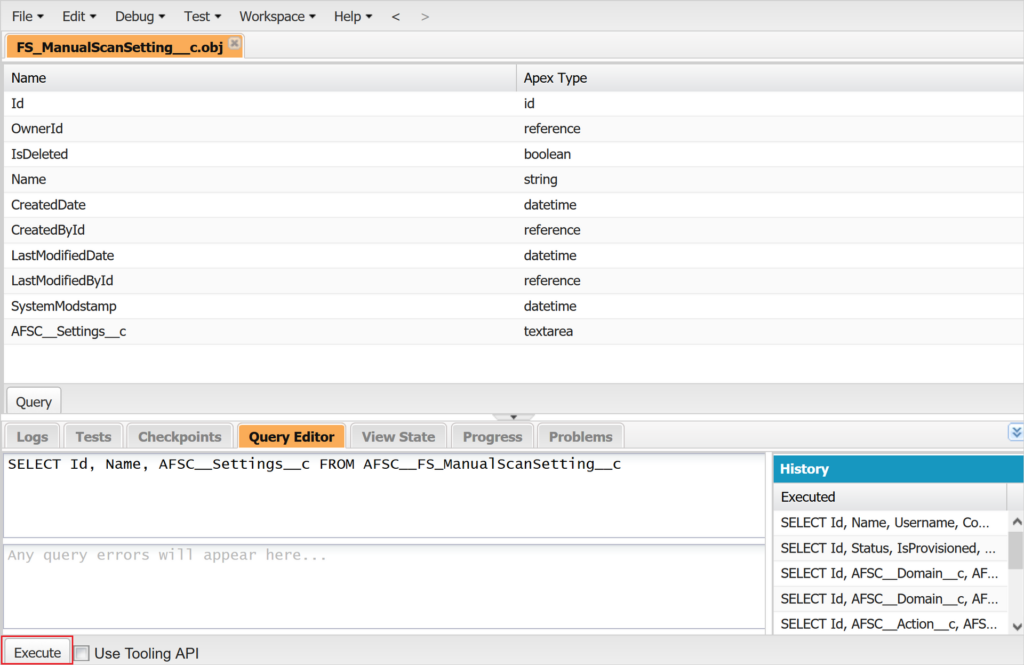
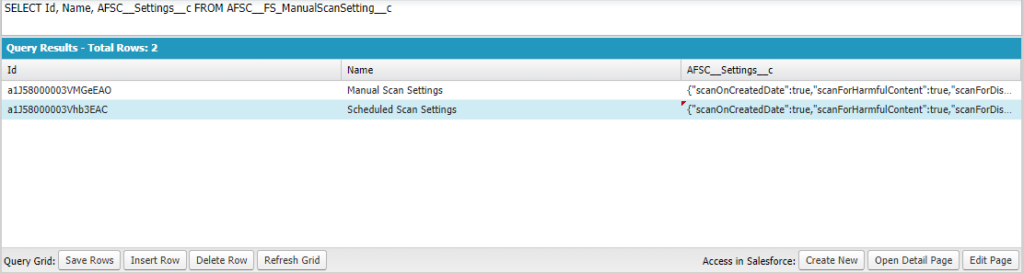
- Click the Query Editor tab, type the following query in the edit box: SELECT Id, Name, AFSC__Settings__c FROM AFSC__FS_ManualScanSetting__c and finally click the Execute button.
- A list of query results are displayed:
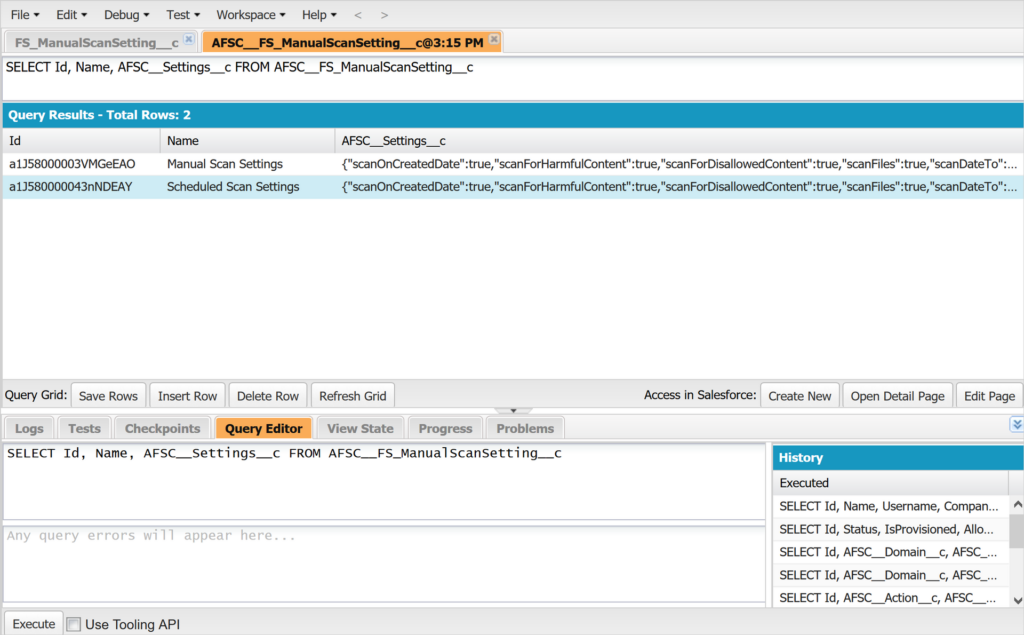
- From the query results, select the record with name Scheduled Scan Settings.
- Note: If the Scheduled Scan Settings record is not shown in the query results, it means that the scheduled scan job has not yet been created. To create a scheduled scan job, see article How can I create and configure a scheduled scan with WithSecure Cloud Protection?
- Double-click the AFSC__Settings__c field and select its contents. The field contains scheduled scan settings in JSON format. Copy and paste the JSON string to a text editor, such as https://jqplay.org/ or http://jsonviewer.stack.hu/ to see and modify the JSON string in a more readable format.
- An example of the JSON string (formatted with jsonviewer) with scheduled scan job settings:
{ “scanOnCreatedDate”: true, “scanForHarmfulContent”: true, “scanForDisallowedContent”: true, “scanFiles”: true, “scanDateTo”: “2018-09-06”, “scanDateFrom”: “2018-09-01”, “scanAttachments”: true, “scanAllLocations”: false, “replaceHarmfulFiles”: true, “replaceDisallowedFiles”: true, “maxScanFileNumber”: 1000, “lastDaysToScan”: 30, “extensionsToScan”: [ { “extensionName”: “docx” }, { “extensionName”: “xlsx” }, { “extensionName”: “xls” }, { “extensionName”: “foo” }, { “extensionName”: “pptx” }, { “extensionName”: “ppt” }, { “extensionName”: “doc” }, { “extensionName”: “pdf” } ], “disallowedTypes”: [ { “extensionName”: “exe” }, { “extensionName”: “ps1” }, { “extensionName”: “vbs” } ], “attachmentsLocations”: [], “allowSetSha1ForContentVersions”: true, “alertOnHarmfulContent”: true, “alertOnDisallowedContent”: true, “actionOnHarmfulContent”: “Passed”, “actionOnDisallowedContent”: “Passed” }
Modify the settings based on your needs.
- To change the date range within which the created or modified files are to be scanned, modify the “lastDaysToScan” setting. Set it to N+1 days where N is the desired period to be scanned. An example: To scan files/attachments created or modified within the previous week, set “lastDaysToScan” setting as follows: “lastDaysToScan”:8
- Note: The value of the “actionOnHarmfulContent” and “actionOnDisallowedContent” settings can be either “Passed” or “Removed”.
- Once you have made your changes, minimize the JSON string and put it to the AFSC__Settings__c field of the Scheduled Scan Settings record in the Developer Console:
To save the changes and commit them to the database. click the Save Rows button.
- The new scheduled scan settings will be taken into use next time the scheduled scan job is executed.